How I Fixed a Bad Push to GitHub and Failed Production Deployment on Vercel

Written by
Adeyemi Adetilewa

I pushed the wrong files to GitHub. I detected this after I got a failed production deployment email from Vercel. My website was already broken, but I was able to fix it fast.
A few days ago I pushed an update to my Next.js and headless WordPress site through the GitHub web app. Vercel auto-deployed it, as it always does, and within seconds my live site was broken.
No local environment, no command line, just the browser-based GitHub interface and a panicking refresh of my homepage. Here is exactly what happened, what I tried, and the steps that fixed it, in case you find yourself in the same situation.
I Pushed the Wrong Files to GitHub? What Went Wrong
I made changes to a few files in my repository. I pushed them directly to the main branch using GitHub’s web interface (not GitHub Desktop, not the terminal, just the browser-based file editor and commit button). Vercel is connected to my GitHub repo, so it automatically detected the push and triggered a new deployment.
The build technically succeeded, meaning Vercel did not throw an error. But the deployed site itself was visually broken: layout issues, missing content sections, and parts of the page failing to render correctly. The problem was in the code itself, not in the build process, which meant Vercel had no way of knowing something was wrong. It just deployed what I gave it.
This is the first lesson worth sharing: a successful deployment and a working website are not the same thing. Vercel will happily ship broken code if that code compiles.
Why A Bad Push to GitHub is Fixable
I want to be upfront about something that made this less stressful than it could have been: both GitHub and Vercel keep history. Nothing was actually lost.
1. GitHub keeps every commit, even the ones before your mistake, as long as you have not force-deleted them.
2. Vercel keeps a record of every deployment it has ever built for your project, and each one stays accessible and instantly restorable.
Knowing this changes the entire approach to a broken deployment. The goal is not to “undo” anything in a destructive sense. It is to point your live site and your repository back at a version of the code that worked.
How to Fix A Bad Push to GitHub
Step 1: Stop the Bleeding With a Vercel Rollback
Before touching any code, the fastest fix is to make the live site work again. I did this through Vercel directly, without changing anything in GitHub.
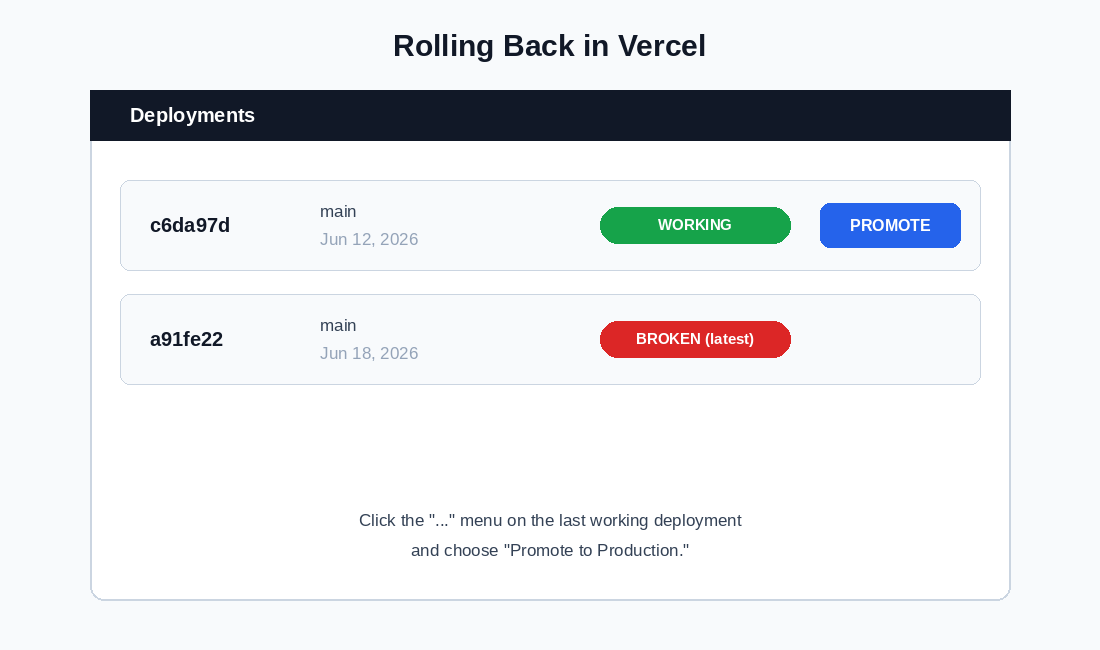
1. I opened my project in the Vercel dashboard and went to the “Deployments” tab.
2. I scrolled through the deployment history and found the last one made before my bad push. Vercel displays the commit SHA next to each deployment, so I matched it against my GitHub commit history to confirm I had the right one.
3. I clicked the three-dot menu next to that deployment and selected “Promote to Production.”
That was it. Within seconds, my live site was back to the last working version. This step does not touch your GitHub repository at all. It just changes which previously built version is currently served to visitors.
If your site is broken right now, do this first. It buys you time to fix the code properly without the pressure of a live, broken site.
Step 2: Identify the Last Working Commit
With the site stable again, I needed to address the actual source code on GitHub, since future pushes would otherwise rebuild from the broken version.
I found the full SHA of my last working commit by looking at my commit history (yourrepo/commits/main in the browser) and matching the timestamp to when the site was still working. A full commit SHA is 40 characters long. It is worth double-checking the length when you copy one, since it is easy to accidentally grab an extra character from a URL or a UI element.
Step 3: Decide How to Restore the Code
This is where I had to make a decision, because GitHub’s web app does not give you a one-click “go back in time” button for your default branch. I considered three options:
Option A: Revert commits.
If the bad changes were merged through a pull request, GitHub sometimes shows a “Revert” button on the commit or PR page, which creates a new commit undoing the changes automatically. This preserves full history and is the cleanest option when available.
Option B: Manually copy files back.
Browse the repository at the old commit, open each changed file, and copy its contents back into the current version of the file through GitHub’s web editor. This works but is slow and error-prone if many files changed.
Option C: Create a new branch from the old commit and make it the default.
This was the option I went with because it was the most reliable to do entirely through the browser, and it does not require GitHub to offer a Revert button.
Step 4: Restore Using a New Default Branch
Here is exactly what I did:
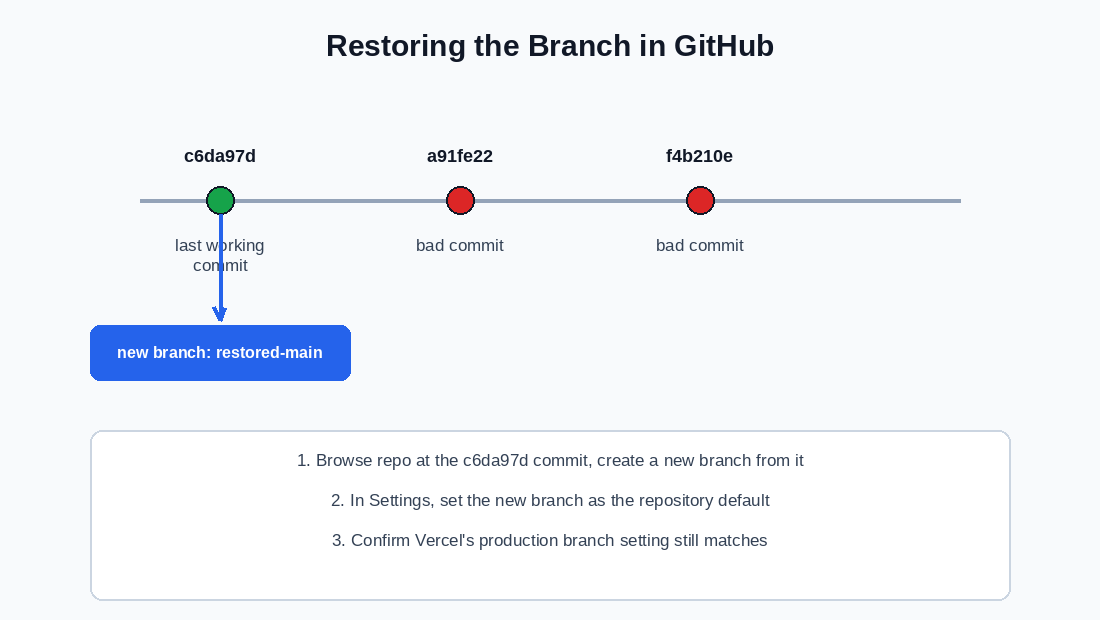
1. I navigated to my repository at the specific commit SHA by visiting yourrepo/tree/<commit-sha> in the browser. This shows the entire repository exactly as it existed then.
2. I clicked the branch dropdown menu (normally labeled “main”) and typed a new branch name, restored-main. GitHub offered to create that branch starting from the commit I was viewing, and I confirmed it.
3. I went into my repository’s Settings, found the “Default branch” section, and switched it from main to restored-main.
4. I went to the branches list and renamed the old, broken main branch to main-broken so I could keep it as a reference without it interfering with anything.
5. Optionally, I renamed restored-main back to main for consistency, since the old broken main was already safely renamed out of the way.
This approach has one major advantage: nothing is deleted. Every commit, including the broken ones, is still sitting in the repository’s history under a different branch name if I ever need to look at them again.
Step 5: Reconnect Vercel to the Correct Branch
After changing branch names in GitHub, I checked my Vercel project settings under Settings → Git to confirm the production branch Vercel was tracking still matched my new default branch name.
This step is easy to skip and will confuse you if missed, since Vercel deploys based on a specific branch name, not just “whatever GitHub calls the default.”
What I Would Do Differently Next Time
A few practical changes came out of this experience, and I am sharing them because they apply to almost any Next.js project deployed through Vercel from GitHub, headless WordPress or not.
1. Use a staging branch
Instead of pushing directly tomain, push to a separate branch first and let Vercel build a preview deployment for it. Preview deployments get their own unique URL, so you can check that everything works before promoting that branch to main.
2. Turn on Vercel’s deployment protection or approval steps if available on your plan
This adds a manual checkpoint before a build goes to production, which would have caught this issue before it ever became visible to visitors.
3. Test the build locally when possible
Even without command-line git workflows, running next build locally before pushing catches a large category of problems, especially anything related to broken imports, missing environment variables, or component errors that do not always surface as a clean error message in Vercel’s build log.
4. Know your commit SHAs
Get comfortable finding and reading commit history in GitHub’s web interface before you need it in an emergency. Knowing where to look costs nothing under normal conditions and saves real time when something breaks.
TL;DR: I Push the Wrong Files to GitHub and Fix It
If your Vercel deployment breaks after you push the wrong files to GitHub and you only have access to the browser, here is how to fix it fast:
1. In Vercel, find the last good deployment by commit SHA and promote it to production. This fixes the live site immediately.
2. In GitHub, find the full SHA of the last working commit.
3. Create a new branch from that commit, then set it as your repository’s default branch, instead of trying to delete or force-push over the bad commits.
4. Rename the old, broken branch out of the way rather than deleting it, so you keep a full record.
5. Confirm Vercel’s production branch setting matches your new default branch name.
Nothing about this process required the command line, a force push, or deleting any history. It is fully achievable through the GitHub web app and the Vercel dashboard, which matters if, like me, that is the only workflow you have set up.
Tags
Share
About the author
Adeyemi Adetilewa
Content Strategy, Product Marketing, and SEO for B2B SaaS
Adeyemi Adetilewa combines expertise in content strategy, product marketing, technical SEO, and AI to help B2B SaaS companies drive product adoption, customer engagement, and sustainable organic growth. Open to remote Product Marketing roles.
Work With Me
Hiring for product marketing, or scaling a B2B SaaS?
I help B2B SaaS companies turn product marketing, content strategy, and technical SEO into systems that drive adoption and organic growth. Open to full-time product marketing roles, contract work, and consulting engagements.
The Digital Strategy Newsletter
Get more like this in your inbox.
Practical insights on SEO, AEO, content strategy, and product building. Free, every week.
Free. View archive. Cancel any time.
Related Content You Might Like

How I Migrated to Headless WordPress with Next.js from Hashnode
When Hashnode shut down its free GraphQL API in June 2026, I had several published posts, zero working blog pages, and a Next.js site that was silently returning empty arrays to every visitor. This is the complete, honest account of how I migrated to a headless WordPress with Next.js from Hashnode in under a week, … Read more
Adeyemi Adetilewa
Content Strategy, Product Marketing, and SEO for B2B SaaS

Website Deployment Failure and Recovery Process for GitHub and Vercel
One bad push to GitHub broke my live website. The build succeeded, Vercel deployed it without complaint, and within minutes adeyemiadetilewa.com was serving a broken layout to every visitor who landed on it. What followed was a website recovery process that took under ten minutes, required no terminal, no Git client, and no local development … Read more
Adeyemi Adetilewa
Content Strategy, Product Marketing, and SEO for B2B SaaS

How I Broke My Live Website and Fixed It Without Writing a Single Line of Code
This is not a theoretical article. I broke my live website, adeyemiadetilewa.com, with a push to GitHub. The build succeeded. Vercel deployed it. And within minutes, I was staring at a broken homepage with no featured blog posts, an empty blog page with no blog posts, and some other missing files. I had a browser, … Read more
Adeyemi Adetilewa
Content Strategy, Product Marketing, and SEO for B2B SaaS