How I Migrated to Headless WordPress with Next.js from Hashnode

Written by
Adeyemi Adetilewa

When Hashnode shut down its free GraphQL API in June 2026, I had several published posts, zero working blog pages, and a Next.js site that was silently returning empty arrays to every visitor.
This is the complete, honest account of how I migrated to a headless WordPress with Next.js from Hashnode in under a week, including the DNS steps, the WPGraphQL setup, the caching fix, and every bug I hit along the way. If you are in the same situation right now, this is the guide I wished existed when I started.
Before you read further: this guide assumes you are running Next.js on Vercel with your domain’s nameservers pointed at Vercel. The DNS section is written specifically for that setup. If your nameservers live elsewhere, the same logic applies, but the dashboard locations will differ.
Why Headless WordPress Over the Other Options?
When the Hashnode API went down, I had four realistic options: pay for Hashnode Pro, move content to MDX files in the repo, switch to a different third-party headless CMS, or migrate to self-hosted headless WordPress. I chose WordPress for three concrete reasons, not abstract ones.
First, I already had WordPress hosting from another project on Verpex. The infrastructure cost of adding a subdomain was zero. Second, I write about building content systems and publications professionally, which means I need SEO plugins, redirect management, and content audit tooling that a flat-file MDX setup simply does not provide. Third, owning the API layer eliminates the specific risk that caused the original failure. No company’s pricing decision can take down an endpoint running on your own server.
The MDX approach is genuinely good for developers who live in their editor and do not need content operations tooling. A third-party CMS like Contentful or Sanity is good for teams who need structured content and collaborative editing.
Headless WordPress is the right choice when you need SEO tooling, full data ownership, and a content interface that non-developers can use without training.
The Architecture Before You Start
Understanding what you are building makes every step easier to follow. The final setup has four components working in sequence.
WordPress running on a subdomain (cms.adeyemiadetilewa.com) stores all your posts. The WPGraphQL plugin exposes those posts through a GraphQL endpoint at /graphql. Your Next.js frontend queries that endpoint and renders post pages using ISR. Vercel delivers the cached pages to visitors globally.
When you publish or update a post in WordPress, a webhook fires immediately and tells Next.js to refresh the relevant cached pages. Visitors always see current content. If the WordPress API is ever temporarily unreachable, visitors keep seeing the last successfully cached version rather than an empty page.
That last property is what makes this architecture meaningfully more reliable than the force-dynamic setup most Hashnode-based headless blogs were using.
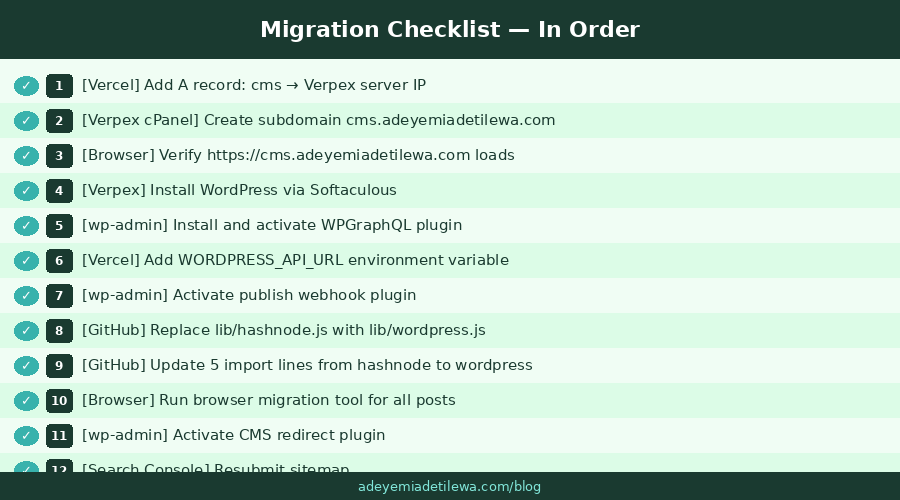
Step 1: DNS Setup Without Switching Nameservers
This is the step most guides get wrong. You do not need to switch your nameservers back to your hosting provider. Your nameservers stay on Vercel.
What you are doing is adding a single DNS record inside Vercel that points the new cms subdomain at your Verpex server. The main domain, its existing records, and your live Next.js site are completely untouched.
NB: I am using Verpex as my hosting provider, and I’ll be using them as my example in this article.
1a. Find your Verpex server IP
Log into Verpex and open cPanel. Look for General Information in the sidebar. Copy the value next to “Shared IP Address.” This is the number you need.
1b. Add the DNS record in Vercel
In Vercel, go to Domains, clickadeyemiadetilewa.com, then DNS Records. Click Add Record and fill in: Type A, Name cms, Value is the IP address from step 1a. Save it.
DNS propagation typically takes 5 to 10 minutes, occasionally longer. Check progress at dnschecker.org by searching for cms.adeyemiadetilewa.com.
1c. Create the subdomain in cPanel
Back in Verpex cPanel, go to Domains and click Create A New Domain. Enter cms.adeyemiadetilewa.com. Accept the suggested document root. cPanel may show a warning that the domain does not currently point to this server. That is expected and will clear once DNS propagates.
Do not proceed until https://cms.adeyemiadetilewa.com loads in your browser without a certificate warning. Verpex’s AutoSSL issues a free SSL certificate automatically once DNS resolves, but WPGraphQL requires HTTPS to work correctly with your Next.js frontend.
Step 2: Install WordPress and WPGraphQL
In Verpex cPanel, open Softaculous (or WordPress Manager) and install WordPress at cms.adeyemiadetilewa.com. Replace “adeyemiadetilewa.com” with your domain name. For example, cms.yourdomainname.com
Leave the install path blank, so it installs at the domain root, not in a subfolder. Save your admin username and password somewhere accessible. You will need them multiple times.
Once WordPress is installed, go tocms.adeyemiadetilewa.com/wp-admin, log in, and navigate to Plugins > Add New. Install and activate WPGraphQL. This single plugin adds the /graphql endpoint your Next.js site will query.
Also install Yoast SEO and WPGraphQL for Yoast SEO if you want per-post SEO metadata available through the GraphQL response.
Before leaving the plugins screen, set your permalink structure. Go to Settings > Permalinks and select “Post name.” This ensures your post slugs are clean paths like /building-an-ai-tools-directory rather than /?p=123. Getting this right before migrating content means your slugs match your old Hashnode URLs exactly.
Step 3: Connect Next.js to WordPress
The code change is smaller than it sounds.
The lib/wordpress.js file I wrote for this migration exports the same four functions as the old lib/hashnode.js file: getAllPosts, getPostBySlug, getLatestPosts, and getAllPostSlugs. The return shapes are identical. The only difference is where the data comes from.
In Vercel, add two environment variables: WORDPRESS_API_URL set tohttps://cms.adeyemiadetilewa.com/graphql, and REVALIDATE_SECRET set to a long random string you generate.
Then in your GitHub repo, upload lib/wordpress.js and update the import line in five files from @/lib/hashnode to @/lib/wordpress. That is the entire code change for the frontend.
The WPGraphQL documentation is comprehensive and worth bookmarking if you plan to extend your queries beyond the basic post fields. You can add custom fields, author data, SEO metadata from Yoast, and more all through the same GraphQL endpoint.
Step 4: Fix the Caching Strategy
This is the most important architectural fix, and it is separate from the Hashnode migration itself.
Most headless Hashnode setups use force-dynamic with cache: 'no-store', which means every single page request triggers a live API call with no fallback. When the API is slow, every visitor waits. When the API fails, every visitor sees an empty page.
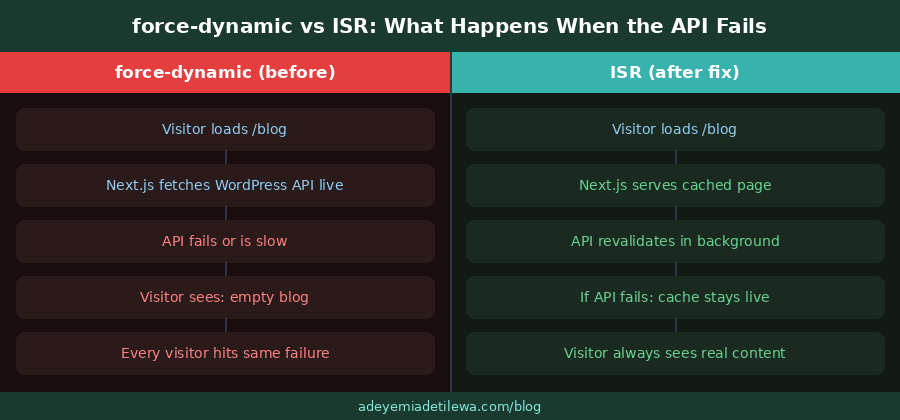
The fix is replacing export const dynamic = 'force-dynamic' with export const revalidate = 86400 in your blog pages. ISR caches each page and revalidates it in the background every 24 hours. If the WordPress API is unreachable during a background revalidation, Next.js keeps serving the last successful cached version. Visitors never see a broken page.
Pair ISR with a publish webhook so new posts appear instantly rather than waiting 24 hours. The webhook lives at /api/revalidate in your Next.js app. WordPress calls it the moment you hit Publish, passing the post slug and a shared secret.
Next.js validates the secret, then calls revalidatePath() for the blog index, the homepage, the sitemap, and that specific post page. The Next.js ISR documentation covers the technical implementation in full.
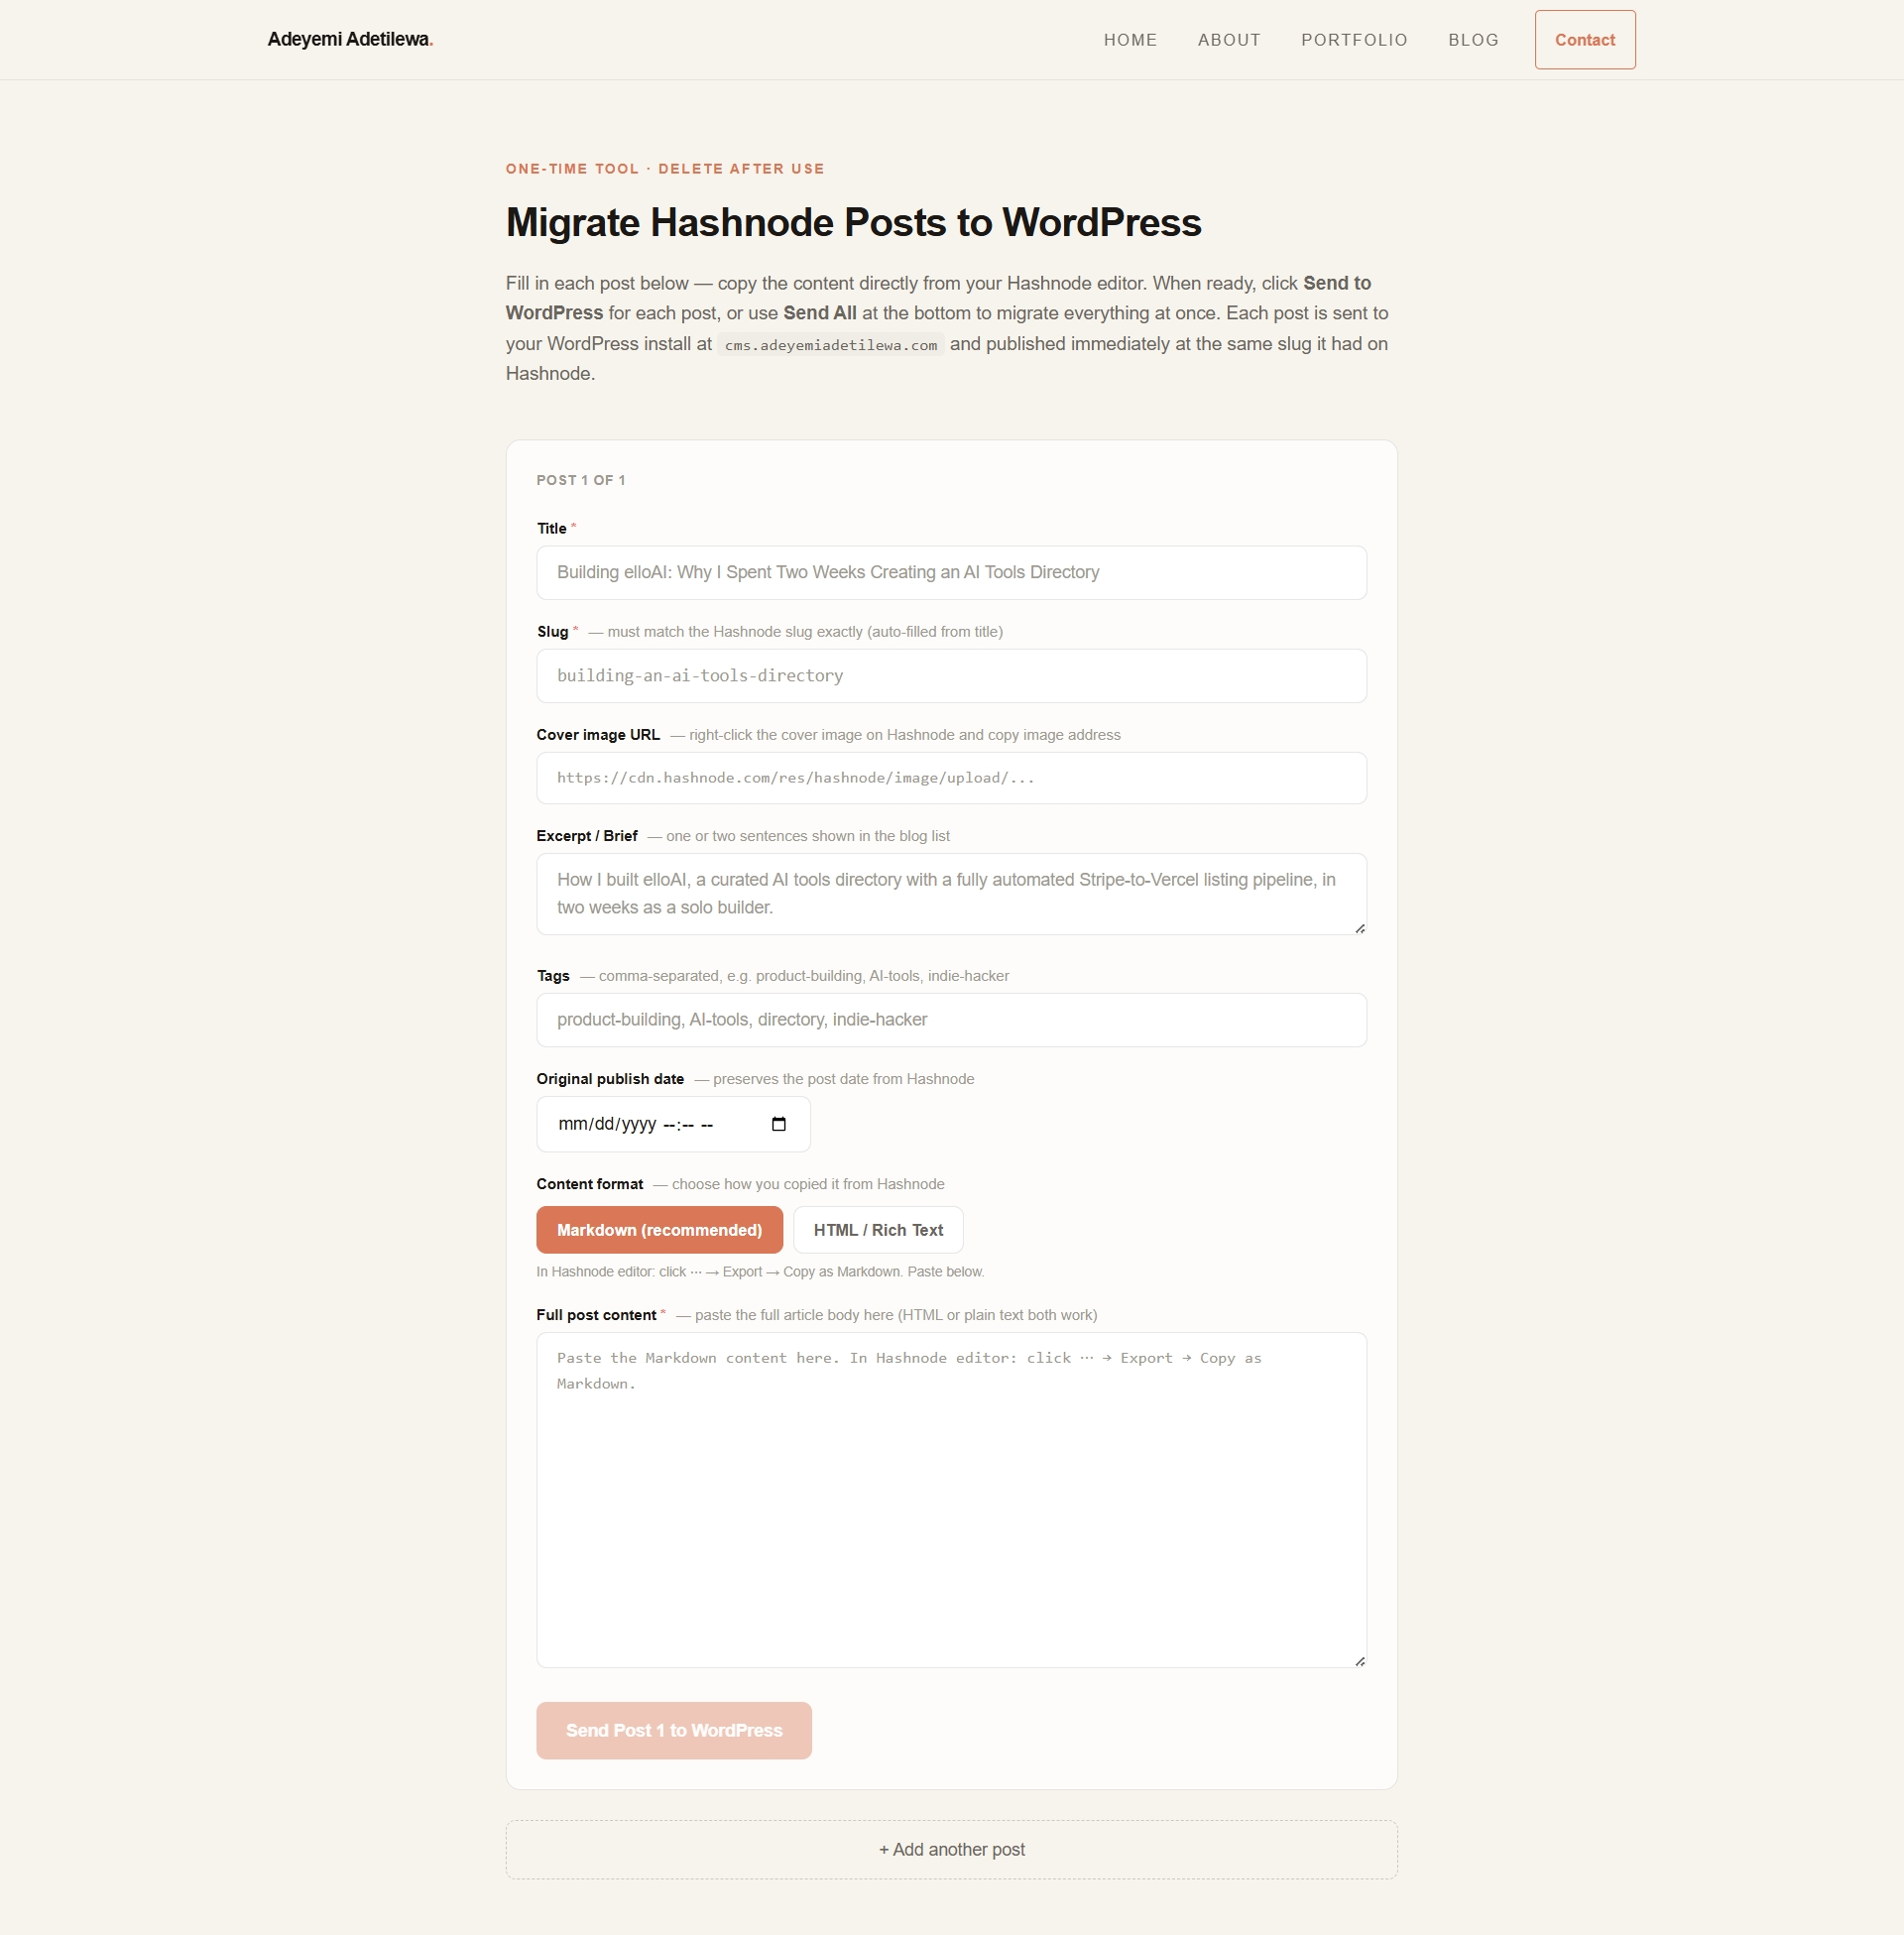
Step 5: Migrate Your Content
Since Hashnode’s API is now paywalled, you cannot script a live pull of your content. You can still access your posts through the Hashnode dashboard editor, though. The approach that worked without requiring Node.js or any local tooling was a browser-based migration form hosted temporarily at adeyemiadetilewa.com/migrate.
The form had fields for title, slug, excerpt, tags, publish date, cover image URL, and full post content. Content was pasted from Hashnode as Markdown, using Hashnode’s built-in export function, and converted to HTML server-side before saving to WordPress.
Cover images were downloaded from Hashnode’s CDN and re-uploaded to the WordPress media library automatically. Internal links pointing to adeyemiadetilewa.hashnode.dev/slug were rewritten to adeyemiadetilewa.com/blog/slug before saving.
The most important detail: use the same slug in WordPress as you used on Hashnode. If your Hashnode post was atadeyemiadetilewa.hashnode.dev/building-an-ai-tools-directory, the WordPress slug must be building-an-ai-tools-directory.
Your Next.js frontend serves posts atadeyemiadetilewa.com/blog/[slug], so matching the slug preserves every existing URL, every backlink, and every search ranking without needing a single redirect.
The Bugs I Hit and How I Fixed Them
No migration goes exactly to plan. These are the three specific errors I encountered, documented so you can skip them.
Bug 1: WordPress rejected the post date
The WordPress REST API requires a full ISO 8601 date format including seconds: 2026-04-09T10:00:00.000Z. The browser’s datetime-local input field sends2026-04-09T10:00, with no seconds. WordPress returns HTTP 400 with rest_invalid_date.
The fix was passing the date value through new Date(publishedAt).toISOString() on the server before sending it to the WordPress REST API, which always produces the correct full format.
Bug 2: Featured images were broken on the Next.js frontend
Featured images uploaded correctly to WordPress and displayed fine at cms.adeyemiadetilewa.com. On the Next.js frontend, they showed as broken placeholders.
The cause: Next.js’s <Image> component blocks any domain not explicitly listed in next.config.mjs under remotePatterns. WordPress stores images atcms.adeyemiadetilewa.com/wp-content/uploads/, which was not on the allowlist. Adding { protocol: 'https', hostname: 'cms.adeyemiadetilewa.com' } to remotePatterns fixed it immediately.
Bug 3: Duplicate function definition broke the build
When I updated lib/hashnode.js with retry logic and timeout handling, I prepended the new function to the top of the file without removing the original function lower down.
Turbopack caught this as a duplicate declaration and failed the build with “the name fetchHashnode is defined multiple times.” The fix was deleting the old function definition, the one without the timeout and retry logic.
The Duplicate Content Problem Nobody Mentions
Here is something almost every headless WordPress tutorial skips: WordPress still serves a fully public frontend by default.
Every post you migrate exists at two URLs simultaneously. Your real site serves it at adeyemiadetilewa.com/blog/building-an-ai-tools-directory. WordPress also serves it at cms.adeyemiadetilewa.com/building-an-ai-tools-directory. Google sees both as separate pages with identical content.
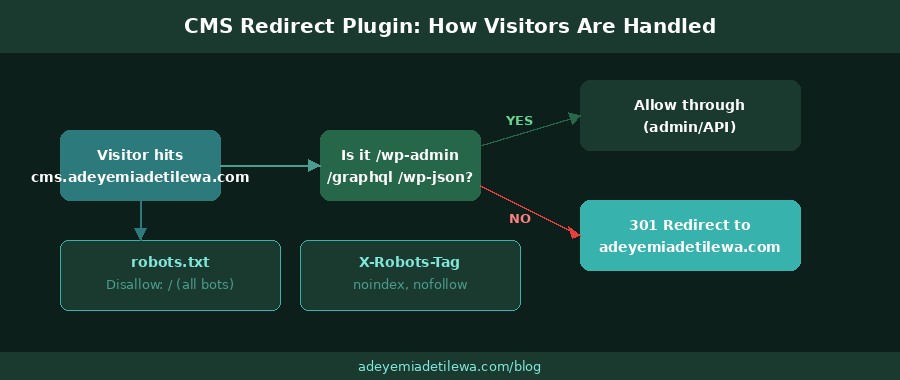
The fix is a small WordPress plugin that does three things. It redirects all public WordPress URLs (posts, archives, categories, the homepage) to the correct Next.js equivalent with a 301. It adds X-Robots-Tag: noindex, nofollow headers to every public response. And it replaces the default WordPress robots.txt with one that disallows all crawlers.
The plugin explicitly excludes /wp-admin, /wp-json, /graphql, and /wp-content/uploads/ from all redirects and blocks so the admin panel, the API, and your uploaded images remain fully accessible.
Install this plugin before you start promoting any of your migrated posts. Duplicate content penalties accumulate silently and can take weeks to recover from once established. You can read more of my thinking on building content systems that rank in my piece on SEO content engines.
The Final State
After completing the migration, all blog posts are live at their original slugs. Featured images load correctly from the WordPress media library. Internal links point to the correct Next.js URLs. The publish webhook fires correctly. Updating a post in WordPress refreshes the live page within seconds. The CMS subdomain redirects public visitors to the real site and is invisible to search engine crawlers.
The blog index, sitemap, and homepage latest-posts section all update automatically when new content is published, with no manual deployment step required. The entire content workflow now lives in WordPress’s visual editor, which is accessible from any device and does not require touching code or GitHub for routine posts.
This is the architecture I should have had from the start. It is more resilient, more capable for content operations, and fully owned. You can see the full range of products and tools I have built using this kind of systematic, ownership-first approach at adeyemiadetilewa.com/portfolio.
I am Adeyemi Adetilewa, a technical SEO specialist and product builder who has been running content platforms and shipping digital products since 2013. Read more about my work here: adeyemiadetilewa.com/about.
Tags
Share
About the author
Adeyemi Adetilewa
Content Strategy, Product Marketing, and SEO for B2B SaaS
Adeyemi Adetilewa combines expertise in content strategy, product marketing, technical SEO, and AI to help B2B SaaS companies drive product adoption, customer engagement, and sustainable organic growth. Open to remote Product Marketing roles.
Work With Me
Hiring for product marketing, or scaling a B2B SaaS?
I help B2B SaaS companies turn product marketing, content strategy, and technical SEO into systems that drive adoption and organic growth. Open to full-time product marketing roles, contract work, and consulting engagements.
The Digital Strategy Newsletter
Get more like this in your inbox.
Practical insights on SEO, AEO, content strategy, and product building. Free, every week.
Free. View archive. Cancel any time.
Related Content You Might Like

How to Move WordPress to Next.js and Hashnode API
This is the story of how I rebuilt my personal website from scratch using Next.js 14, Hashnode as a headless CMS, GitHub for version control, and Vercel for deployments, and why, after years of building on WordPress, this stack finally feels right.
Adeyemi Adetilewa
Content Strategy, Product Marketing, and SEO for B2B SaaS

How I Fixed a Bad Push to GitHub and Failed Production Deployment on Vercel
I pushed the wrong files to GitHub. I detected this after I got a failed production deployment email from Vercel. My website was already broken, but I was able to fix it fast. A few days ago I pushed an update to my Next.js and headless WordPress site through the GitHub web app. Vercel auto-deployed … Read more
Adeyemi Adetilewa
Content Strategy, Product Marketing, and SEO for B2B SaaS

How I Built an Automated Booking Funnel for a Certified Marriage Counselor
I built an automated booking funnel for my wife, a certified marriage counselor, that works. Sometime last month, my wife told me she wanted to start running ads for her business, a private counseling practice for individuals and couples. She wanted to create a structure around her business and time. Her request was simple enough, … Read more
Adeyemi Adetilewa
Content Strategy, Product Marketing, and SEO for B2B SaaS