Why You Should Have a Staging Branch Before Pushing to Main Branch

Written by
Adeyemi Adetilewa

Pushing to main branch directly without having a staging branch is one of those habits that feels efficient right up until it is not.
Your workflow is fast, your changes go live immediately, and there is no friction between writing code and seeing it deployed. Then one day you push something to main branch directly that breaks your live site, and that friction you avoided turns into an emergency instead.
A staging branch eliminates that scenario, and setting one up requires nothing more than a few clicks in GitHub.
The Problem With Pushing Directly to Main Branch
When your GitHub repository is connected to Vercel, every push to main triggers a production deployment automatically. This is a feature, not a bug, but it means that main is always live. There is no buffer between your keyboard and your visitors.
In practice, this creates a situation where the only way to see how a change looks in production is to put it into production. You cannot preview it at your real domain, with your real data, in the actual deployed environment, without first making it live to everyone.
For minor changes like fixing a typo or updating a color value, this is low risk. For anything more significant, a component refactor, a layout update, a change to how content is fetched from your website, you are essentially running a live experiment on your real audience without a way to roll it back in under a minute.
A staging branch solves this by giving you a second environment that is identical to production in every meaningful way, but not actually live to the public.
Direct Push Versus Branch Workflow

With direct push to main branch:
Every change you make goes through a single path: edit, commit to main, Vercel builds and deploys, the live site is updated.
There is no point in that chain where you can see the result before visitors do. If something is wrong, your only options are to fix it fast under pressure or roll back to a previous deployment.
With a staging branch:
You edit and commit to your staging branch. Vercel builds a preview deployment for that branch and gives it a unique URL, something like project-name-git-staging-username.vercel.app. You open that URL in your browser and check the full site.
If something looks wrong, you fix it on the staging branch and check the preview again. When everything looks right, you merge staging into main, which triggers the production deployment. At that point you already know what the result will look like.
The total time difference between these two workflows is usually under two minutes. The difference in confidence and safety is significant.
How Vercel Preview Deployments Work
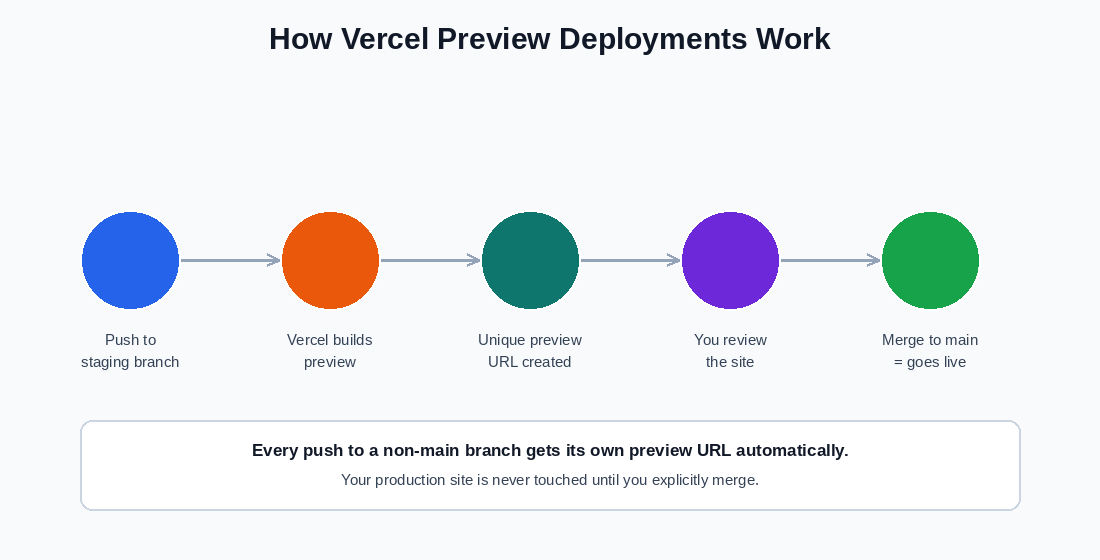
Vercel automatically creates preview deployments for every push to any branch that is not your production branch. You do not need to configure anything for this to happen.
As soon as you push to a branch called staging (or any other name that is not main), Vercel:
1. Detects the push via the GitHub integration
2. Triggers a build using the same build settings as production
3. Deploys the result to a unique preview URL
4. Reports the preview URL back to your GitHub pull request (if you have one open) as a status check
The preview environment uses the same environment variables you have configured in Vercel unless you specifically set up environment-specific variables, which is an optional but useful step for more complex setups.
Crucially, the preview deployment does not touch your production domain at all. Your live site remains exactly as it was while your changes are being previewed. Only when you explicitly merge or promote a change does production update.
Setting Up a Staging Branch in GitHub Web Interface
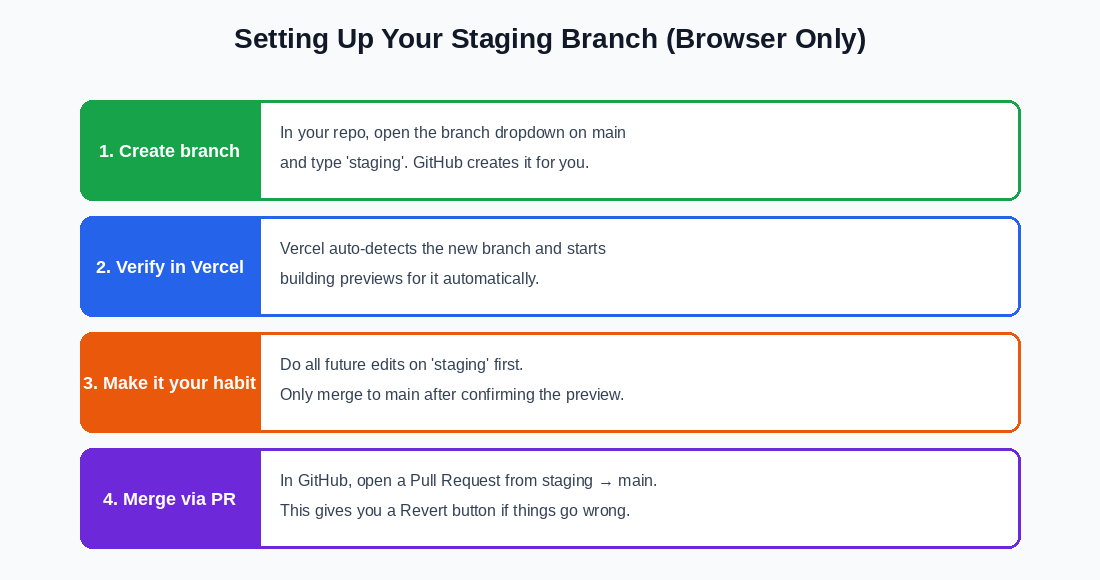
The entire setup takes about five minutes and requires only the GitHub web interface.
Step 1: Create the branch.
Go to your repository on GitHub. Click the branch dropdown near the top-left of the file list (it currently shows “main”). Type staging in the text box. GitHub will offer to create a new branch called staging from your current main. Click the option to create it. You now have a staging branch that is an exact copy of main at this moment in time.
Step 2: Verify Vercel detects it.
Go to your Vercel project dashboard. Within a moment or two of creating the branch, Vercel will detect the new branch and may even automatically trigger a preview build for it. You do not need to configure anything; this is handled by the GitHub integration. You can check the Deployments tab to confirm the preview URL appears.
Step 3: Make it your working habit.
From this point forward, do all of your code editing on the staging branch instead of main. When you make a commit on staging, check the Vercel preview URL to confirm the change looks right in the real deployed environment. Only after you are satisfied do you move the change to main.
Step 4: Merge via pull request.
In GitHub, to move your staging changes to main, open a Pull Request from staging into main.
This has two benefits: it gives you one final review of all the changes before they go to production, and it creates a merge commit that has a built-in “Revert” button in GitHub. If something goes wrong after you merge, you can hit that Revert button, and GitHub creates a new commit that undoes the merge, which Vercel then deploys automatically.
This is a much cleaner rollback than manually restoring old files.
What to Do When Staging Gets Out of Sync
Over time, if you are sometimes making small edits directly on main (or merging fixes from main back into staging), the two branches can diverge.
The simplest way to handle this in the GitHub web interface is to open a pull request from main into staging to bring staging up to date with the latest production code. This is sometimes called “syncing” or “updating” your branch.
GitHub also has a built-in “Sync branch” button that appears on branch pages when a branch is behind the branch it was created from. This handles the most common case automatically.
Handling Your Environment Variables
One thing worth checking when you set up a staging branch is how your environment variables are configured in Vercel.
By default, environment variables you set in Vercel apply to all deployments, including previews. This means your staging previews will connect to the same WordPress instance as your production site.
For most personal and small sites, this is fine. If you want staging to point to a separate WordPress installation or test database, you can configure environment-specific variables in Vercel under Settings → Environment Variables, where you can choose whether a variable applies to Production, Preview, or Development environments separately.
The Return on Investment
The time cost of a staging branch is small. Creating it takes five minutes. Checking a preview URL before merging adds maybe two minutes per deployment.
The time saved by catching a layout issue in staging before it goes live, and avoiding an emergency rollback while a broken site is live to visitors, is much larger than that.
Once the habit is established, pushing directly to main starts to feel reckless rather than efficient. The preview step becomes the normal way of working, and broken production deployments become rare rather than occasional.
TL;DR: Have A Staging Branch Before Pushing to Main Branch
Create a branch called staging from your main branch. Do all your edits there. Check the Vercel preview URL before merging.
Merge into main using a pull request so you have a Revert button available. That is the entire workflow. It costs almost nothing to set up and eliminates the most common cause of emergency rollbacks.
Tags
Share
About the author
Adeyemi Adetilewa
Content Strategy, Product Marketing, and SEO for B2B SaaS
Adeyemi Adetilewa combines expertise in content strategy, product marketing, technical SEO, and AI to help B2B SaaS companies drive product adoption, customer engagement, and sustainable organic growth. Open to remote Product Marketing roles.
Work With Me
Hiring for product marketing, or scaling a B2B SaaS?
I help B2B SaaS companies turn product marketing, content strategy, and technical SEO into systems that drive adoption and organic growth. Open to full-time product marketing roles, contract work, and consulting engagements.
The Digital Strategy Newsletter
Get more like this in your inbox.
Practical insights on SEO, AEO, content strategy, and product building. Free, every week.
Free. View archive. Cancel any time.
Related Content You Might Like

Website Deployment Failure and Recovery Process for GitHub and Vercel
One bad push to GitHub broke my live website. The build succeeded, Vercel deployed it without complaint, and within minutes adeyemiadetilewa.com was serving a broken layout to every visitor who landed on it. What followed was a website recovery process that took under ten minutes, required no terminal, no Git client, and no local development … Read more
Adeyemi Adetilewa
Content Strategy, Product Marketing, and SEO for B2B SaaS

How I Broke My Live Website and Fixed It Without Writing a Single Line of Code
This is not a theoretical article. I broke my live website, adeyemiadetilewa.com, with a push to GitHub. The build succeeded. Vercel deployed it. And within minutes, I was staring at a broken homepage with no featured blog posts, an empty blog page with no blog posts, and some other missing files. I had a browser, … Read more
Adeyemi Adetilewa
Content Strategy, Product Marketing, and SEO for B2B SaaS

Why a Successful Build in a Vercel Deployment Does Not Mean a Working Website
When Vercel tells you “Build: Successful,” it feels like confirmation that everything is fine. It is not. A successful build means your code compiled without errors. It says nothing about whether your website actually works, looks correct, or serves the right content to the people visiting it. This distinction matters, and understanding it is the … Read more
Adeyemi Adetilewa
Content Strategy, Product Marketing, and SEO for B2B SaaS